The GP-219 Gauss Pistol is a self-contained, two-stage coil gun. What
follows is a brief description of each subsystem and how it all works together to accelerate the
projectile.
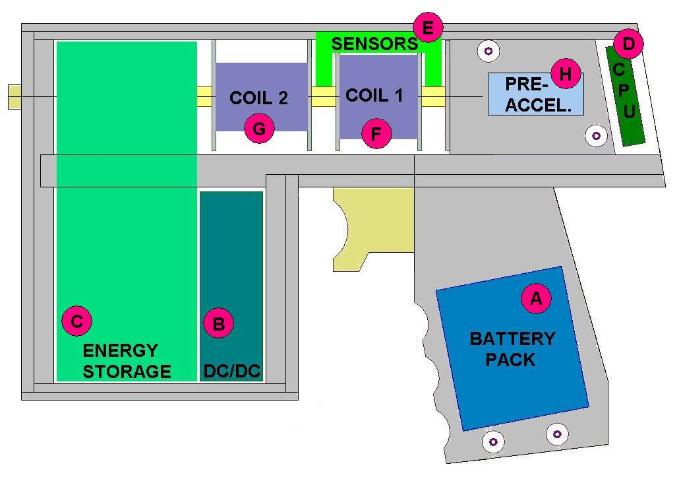
Subsystems
A. 8 x AA NiCd Rechargeable Battery
Pack Nominal voltage +9.6 VDC
B. DC/DC Converter Unit Battery charging circuit Capacitor Bank charging
circuit Regulated +5 VDC output Regulated +20 VDC output Laser module supply Temperature
sensor
C. Energy Storage Unit Capacitor Bank 1, 1,620 uF, 450 VDC Capacitor
Bank 2, 540 uF, 450 VDC Two parallel-IGBT circuits, one pair to fire each coil
D. Control Unit PIC microcontroller manages all pistol functions
(description below) Ten-segment LED bar shows cap bank charging progress "Ready", "Battery", and "Fault"
LEDs
E. Sensor Unit Two infrared reflection sensors detect presence of
the projectile
F, G. Coils Two hardened solenoidal coils, surrounded by iron to
enhance flux linkage
H. Preaccelerator Projectile is held in place magnetically (so it
doesn't fall out prior to firing). Initial velociy (<2 m/s) achieved using a solenoid fired by 10V Ultra
Capacitors, which injects the projectile into the firing tube.
Digital Outputs Fire control 1 Fire control 2 Cap bank charge
control Battery charge control "Ready" LED indicator "Battery" LED indicator "Fault" LED
indicator
The Firing Sequence
1. When the trigger is pulled the Preaccelerator
injects the steel projectile into the firing tube. (A non-ferromagnetic projectile will not
work).
2. Optical Sensor 1 detects the presence of the
projectile at the entrance of Coil 1, and triggers an interrupt inside the micro.
3. The micro waits for a specified delay time
after receiving the interrupt before pulsing the IGBTs, dumping the charge stored in Capacitor
Bank 1 through Coil 1.
4. The resulting magnetic field sucks the
projectile into Coil 1. The pulse time is precisely controlled by the micro to ensure the
field collapses fully by the time the projectile is midway through Coil 1.
The pulse
turn-off is the most critical aspect of timing. If any of the magnetic field is still present after the middle of the projectile passes the midpoint of
the coil then the projectile will experience a
"suck-back" effect. Late turn-off could not only slow down the projectile, it could even
cause it to change direction and shoot backwards!
5. The projectile is detected by Optical Sensor
2 when it emerges from Coil 1.
6. The micro waits a specified delay time before
pulsing the IGBTs, dumping the charge stored in Capacitor Bank 2 through Coil 2.
7. The resulting magnetic field accelerates the
projectile into Coil 2. The pulse time is precisely controlled by the micro to avoid the
suck-back effect.
All delay and pulse times are calibrated by trial and error to optimize muzzle
velocity. These constants may be reprogrammed for nonstandard coil or projectile
specs.
Charging the Capacitor
Banks
Charging the Batteries
I will be adding to this page in the near future,
including empirical results!